How to Quickly Sharpen Shears?
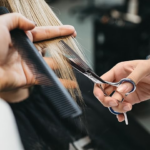
Hair shears are a hairstylist’s most valuable tool, and keeping them sharp is essential for achieving precise and clean cuts. Dull shears not only make haircuts more challenging but can also damage hair and cause split ends. Learning to sharpen shears quickly is a valuable skill that can save you time and money. This article will guide you through the steps to sharpen shears effectively, making them feel brand new and ready for professional use.
Tools and Materials
Before we get into the sharpening process, gather the following tools and materials:
- Dull hair shears
- A fine-grit sharpening stone or diamond sharpening rod
- A soft cloth or towel
- Lubricating oil (clipper oil or sewing machine oil)
- A small brush or toothbrush
- Safety goggles
Step 1: Safety First
Safety is a top priority when working with sharp objects. Before starting, put on your safety goggles to protect your eyes from any debris that may be produced during the sharpening process.
Step 2: Cleaning the Shears
Begin by cleaning the shears thoroughly to remove any hair, dust, or residue. Use a soft cloth or towel to wipe the blades clean. You can also use a small brush or toothbrush to remove any stubborn debris between the blades.
Step 3: Disassembling
If your shears can be disassembled, it’s a good idea to do so at this point. Carefully take the shears apart, being sure to keep track of any screws or components. This will make it easier to access and sharpen each blade individually.
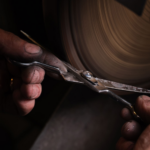
Step 4: Sharpening
Now, let’s sharpen the shears. You’ll need a fine-grit sharpening stone or diamond sharpening rod for this step. Follow these instructions:
- Hold the sharpening stone or rod firmly in one hand.
- With the other hand, hold one of the shear blades at a 10 to 15-degree angle to the stone or rod.
- Starting from the base of the blade, gently stroke the blade toward the tip using smooth, consistent motions. Maintain the same angle throughout the process.
- Repeat this motion several times on one side of the blade until you see a clean, shiny edge.
- Flip the shear blade over and repeat the process on the other side.
- If you have disassembled the shears, repeat the sharpening process for the second blade.
Step 5: Lubrication
To prevent rust and keep your shears in excellent working condition, apply a few drops of lubricating oil to the blades. Open and close the shears a few times to ensure the oil is distributed evenly. Wipe off any excess oil with a clean cloth.
Step 6: Reassembly
If you disassembled the shears in Step 3, carefully reassemble them, making sure all components are correctly aligned and tightened.
Step 7: Testing
Before using your shears on clients’ hair, it’s crucial to test them. Trim a small section of hair or a piece of paper to ensure they are sharp and cutting accurately. If needed, repeat the sharpening process until the shears are performing at their best.
Maintenance Tips
To keep your hair shears in optimal condition between sharpenings, consider these maintenance tips:
- Clean your shears after each use to remove hair and product residue.
- Apply a drop of oil to the pivot point regularly to keep the blades moving smoothly.
- Store your shears in a protective case to prevent damage and maintain their sharpness.
Conclusion
Learning how to quickly sharpen shears is a valuable skill for hairstylists and anyone who uses these tools. By following the steps outlined in this article and practicing regular maintenance, you can keep your shears in top-notch condition, ensuring clean and precise cuts for your clients and prolonging the life of your valuable tools. With the right care and attention, your shears will always feel like new, ready to help you create beautiful hairstyles. However, The Sharpening Essential Kit is your trusted companion for keeping your blades, shears, and knives razor-sharp.